

Maternity Pad Machine Manufacturer: Your Guide to Quality Production
2026-10-21
If you’re evaluating maternity pad machines, you already know the market won’t forgive a single inconsistent pad. What you may not know is that most line inefficiencies trace back to three overlooked design choices—not the headline speed or servo count. Womeng has spent years refining those exact details, and this guide walks you through what to look for before you sign a purchase order.
The One Specification Most Buyers Overlook in Maternity Pad Machines
While production speed, pad length range, and packaging compatibility tend to dominate purchase conversations, the specification that quietly determines long-term yield is SAP deposition uniformity. Maternity pads carry far more superabsorbent material than standard sanitary napkins, so even small deviations across the forming width create clumps, soft spots, and uneven swelling that operators will spend entire shifts correcting.
A typical datasheet lists an average add-on weight per pad, but that average hides what actually happens lane by lane. A machine may hit a 14-gram target on paper while delivering 20 grams in one lane and 8 in another. For thicker maternity cores, that kind of imbalance leads to gel blocking and a pad that feels lumpy before it reaches the wrapper, which then forces slower run speeds and higher scrap rates.
Instead of asking only about output per minute, request the coefficient of variation for SAP dosing across all lanes at maximum speed. A CV value below 5% is a practical indicator that the machine can hold absorbency tolerances as pulp blends, humidity, and tension drift during a full production day. This one number often predicts whether a line becomes a reliable workhorse or a daily troubleshooting project.
How to Test a Maternity Pad Machine Before It Reaches Your Factory Floor
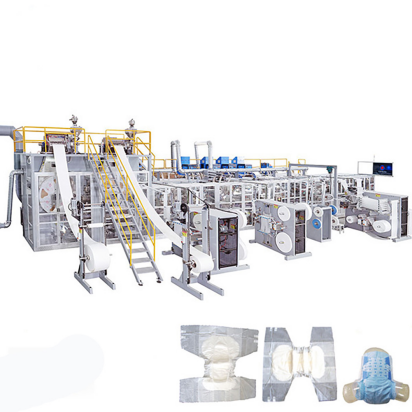
Testing a maternity pad machine before it reaches your factory floor starts with a dry run of the production line under conditions that mirror real usage. You want to push the machine through a full cycle with scrap material first—this catches misaligned folding plates, uneven adhesive application, or weak ultrasonic sealing without wasting actual nonwoven fabric. Pay close attention to the tension on the elastic ear strips and the positioning of the release paper; if these drift by even a few millimeters during a twenty-minute run, the finished pads will bunch or fail to stick properly inside the user's underwear.
Next, run a batch of actual raw materials—fluff pulp, SAP, nonwoven topsheet, and backsheet film—through the machine at three different speeds: low, medium, and the factory's intended maximum. Measure the weight and thickness of the pads at each speed; a drop in SAP distribution or a sudden increase in thickness variance above 5% usually signals a dosing screw that binds or a vacuum drum that loses suction at higher RPMs. Also check the pad's side gathers after the machine has been running for at least half an hour, since heat buildup in the folding guides can cause the gathers to wrinkle or flatten in ways that don't show up during a cold start.
Finally, have a technician simulate a paper jam or a splice in the raw material roll and watch how the machine recovers. A good maternity pad machine should stop within three cycles, alert the operator with a clear error code, and allow a restart without leaving half-formed pads stuck in the sealing station. If the machine routinely chews the material splice or requires manual intervention to clear the line, it will cost you hours of downtime later. Only after these checks pass should you sign off on the machine for shipment to your floor.
Why Material Waste Creeps Up and How to Stop It
Material waste rarely arrives as a dramatic collapse. It builds quietly: a few extra centimeters trimmed from every sheet, a pallet left in the rain because storage space ran out, a batch mixed slightly over spec just to be safe. Over weeks, these small overages compound into a meaningful drain on both budget and schedule. The first step to stopping the creep is noticing it. Walk the site at different times of day, not just during the morning briefing. Watch where offcuts land, which bins fill fastest, and who handles the same board twice. You'll often find the real culprit isn't carelessness but habit — a cutting list that hasn't been updated since the design changed, or a delivery schedule that forces crews to move stock out of the way repeatedly.
Once the patterns are visible, tighten the loop between planning and execution. Instead of relying on standard waste factors—often padded to cover worst-case scenarios—use actual cut lists from the last three similar jobs. Share those numbers with the crew before materials arrive, and have the lead carpenter mark cut priorities directly on the stock. A simple dry-erase board near the saw station showing today's target offcut dimensions works better than a laminated poster in the office. When a change comes from the field, insist on a quick photo and note before extra material is ordered. This creates a feedback loop where waste becomes a visible, named cost rather than an invisible overhead.
Finally, build in accountability without blame. Set a weekly five-minute stand-up to review the waste area: what ended up in the scrap pile, why, and whether it was avoidable. Celebrate the small wins—a ninety percent yield on a tricky framing package or a clean handoff from drywall to finish. Over time, these conversations shift the crew's mindset from "use whatever it takes to finish fast" to "measure twice, cut once, and know where the offcuts go." Stopping material waste isn't about squeezing every last penny; it's about respecting the resources already on site and keeping them out of the landfill.
Small Adjustments That Improve Seal Integrity on Every Pad
Most leaks aren't caused by major design flaws—they come from tiny, overlooked shifts in how a pad sits against the surface. One of the easiest fixes is to check the mating angle before applying pressure. A pad that's even half a degree off creates uneven compression, leaving a micro-gap where air or fluid can sneak through. By gently rocking the pad into place and feeling for a consistent bite around the entire perimeter, you eliminate the need for extra force later.
Another adjustment that pays off is controlling the initial contact speed. Slamming a pad onto a surface often folds a thin lip or traps debris under the edge, both of which break the seal silently. Instead, bring the pad in slowly until you feel the first hint of resistance, then pause for a breath. That small hesitation lets the material settle into the surface's texture, filling microscopic valleys before full load is applied. It's a habit that takes seconds but extends the life of every pad.
Finally, don't ignore the back of the pad. A tiny burr or a stray piece of old adhesive on the backing plate can tilt the pad just enough to cause a repeat failure. Run a fingertip around the mounting area before each use and remove any buildup with a soft scraper. Pair that with a quick check that all fasteners are tightened in a star pattern—not one by one around the circle—and you'll see a noticeable drop in random seal blowouts. These aren't expensive upgrades; they're just small, deliberate habits that keep every pad working like it should.
When Manual Processes Still Beat Full Automation
Walk into any modern office and you'll hear the same refrain: automate everything. Yet ask the people actually doing the work, and a different story emerges. Manual processes, the ones we're told are slow and error-prone, often hold a quiet advantage. They bend where scripts break, adapt where rigid workflows stall, and carry a layer of human judgment that no rule engine has fully replicated.
Consider the customer service rep who spots a typo in a templated email and fixes it before sending, or the accountant who catches a suspicious invoice because the vendor's address looks slightly off. These aren't failures of automation; they're reminders that many tasks sit in a gray zone. Full automation assumes the world is predictable. Manual steps thrive exactly where it isn't.
The real skill isn't choosing one over the other, but knowing when a human hand is faster, cheaper, or simply safer. Sometimes the best system is a well-designed checklist, a sharp pair of eyes, and the freedom to say: this one needs a person.
The Hidden Link Between Machine Vibration and Product Quality
Walk through any production floor and you'll feel it before you see it—the low hum, the rhythmic shudder, the faint rattle from a motor that's been running a little too hot for a little too long. Most operators shrug it off as normal wear. But that vibration is more than background noise. It's a running commentary on the health of the machine, and it seeps into every unit that rolls off the line. When a spindle wobbles by a few microns, that wobble doesn't stay in the housing. It travels through the tool, into the cut, and finally into the surface finish of the part you're shipping to a customer who expects perfection.
The connection isn't always dramatic. Sometimes it's a subtle shift in bearing preload after a maintenance cycle. Sometimes it's a worn belt that slips just enough to change the feed rate by half a percent. Over the course of a shift, that half percent becomes a dimensional drift nobody notices until the CMM report shows a bell curve leaning the wrong way. Vibration analysis usually focuses on catastrophic failure—catching the crack before the shaft snaps. But the hidden link runs deeper: every oscillation is a tiny hammer blow against the geometry of the product. A milling head that vibrates at 400 hertz will leave chatter marks that look fine to the naked eye but act as stress risers under load. A filling nozzle that trembles during dosing will deliver inconsistent volumes that pass inspection but fail in the field.
So what do the best plants do differently? They stop treating vibration as a maintenance checkbox and start reading it as a quality signal. Instead of waiting for the alarm threshold, they correlate vibration signatures with scrap rates, surface roughness data, and customer returns. A slight increase in the 2x running speed peak on a motor might correlate with a rise in porosity in cast parts. On a bottling line, a change in the high-frequency band from a capping head can predict seal failures days before a leak test catches them. The machines are already telling you what's wrong with your product—you just have to listen to the right frequency.
FAQ
Beyond basic specs, pay attention to how they handle material feeding and sealing. A machine that consistently handles non-woven and fluff pulp without jamming will save you more downtime than one with a slightly faster rated speed. Ask about their testing process for absorbency and whether they offer remote diagnostics.
Yes, but it depends on the design. Many modern lines use servo-driven cutting and adjustable forming drums, so changing from regular to overnight pads might take under fifteen minutes with a well-trained operator. If you plan frequent changeovers, look for tool-less adjustment features.
Request samples made on the exact configuration you're considering, not a demo unit. Check edge sealing under light, pull the wings to test elasticity, and weigh cores from different positions on the web. Also ask for a trial run with your own raw materials if possible.
Daily cleaning of adhesive applicators and forming screens is non-negotiable. Weekly checks on ultrasonic welders and tension rollers prevent most failures. Keep a log of wear parts like cutting blades and replace them before visible dulling affects pad shape.
Many newer machines can process bamboo fiber, organic cotton, and plant-based films, but they often require changes to sealing temperature and tension. Confirm the manufacturer has tested those specific materials, because not every eco-friendly substrate runs well on standard equipment.
Expect at least two weeks of on-site training for operators and maintenance staff, plus detailed video manuals. The best suppliers also offer remote troubleshooting with access to PLC logs, so issues get resolved without waiting for a technician to fly out.
Clarify what is included in the base price: spare parts kit, installation, and first-year software updates. Some quotes leave out things like air compressors, conveyor extensions, or safety guarding, which can add tens of thousands. Ask for a full line layout before signing.
Conclusion
When evaluating a maternity pad machine manufacturer, buyers often fixate on speed and price while ignoring the core specification that dictates long-term reliability: the consistency of ultrasonic sealing under variable material tension. A machine that performs flawlessly with one nonwoven lot can drift into weak seals or burn-through with the next, yet few factories test for this before signing off. Running trial batches with three different material suppliers, measuring seal strength at both ends of the roll, and verifying that the servo-driven feeding system compensates for stretch will reveal problems that spec sheets hide. Likewise, vibration isolation is rarely discussed, but a worn bearing or unbalanced roller on a high-cycle line transmits micro-oscillations that loosen adhesive patterns and create uneven pad cores. Checking for vibration with a simple accelerometer during dry runs—not just production runs—can prevent months of quality complaints.
Material waste is another silent profit killer, often creeping in through improper splice detection or over-tensioned unwind stands that snap thin films. A well-designed machine uses dancer rollers and automatic edge guides to keep waste below two percent, but operators still need to understand when manual intervention beats full automation. For example, changing absorbent core weights between product sizes is often faster and more accurate by hand than by a poorly tuned automatic dosing system. Seal integrity improves with small, overlooked adjustments: raising anvil temperature by a few degrees for high-SAP cores, or slowing the sealing horn dwell time by twenty milliseconds on thicker topsheets. Before any machine reaches your factory floor, insist on a documented factory acceptance test that runs your actual materials at your target speed for at least eight continuous hours, with samples pulled every thirty minutes for peel and leak testing. These practical checks separate a true manufacturing partner from a vendor selling shiny brochures.
Contact Us
Contact Person: Jessie Lai
Email: [email protected]
Tel/WhatsApp: 86-188594442931
Website: https://www.wm-machinery.com